Customizing Claude Code for Your Development Workflow
Claude Code ships with capable defaults, but the real productivity gains come from customizing it to match your specific development workflow. Several extension mechanisms transform Claude Code from a general-purpose assistant into a specialized development partner that understands your project’s conventions, enforces your team’s standards, and automates your repetitive tasks.
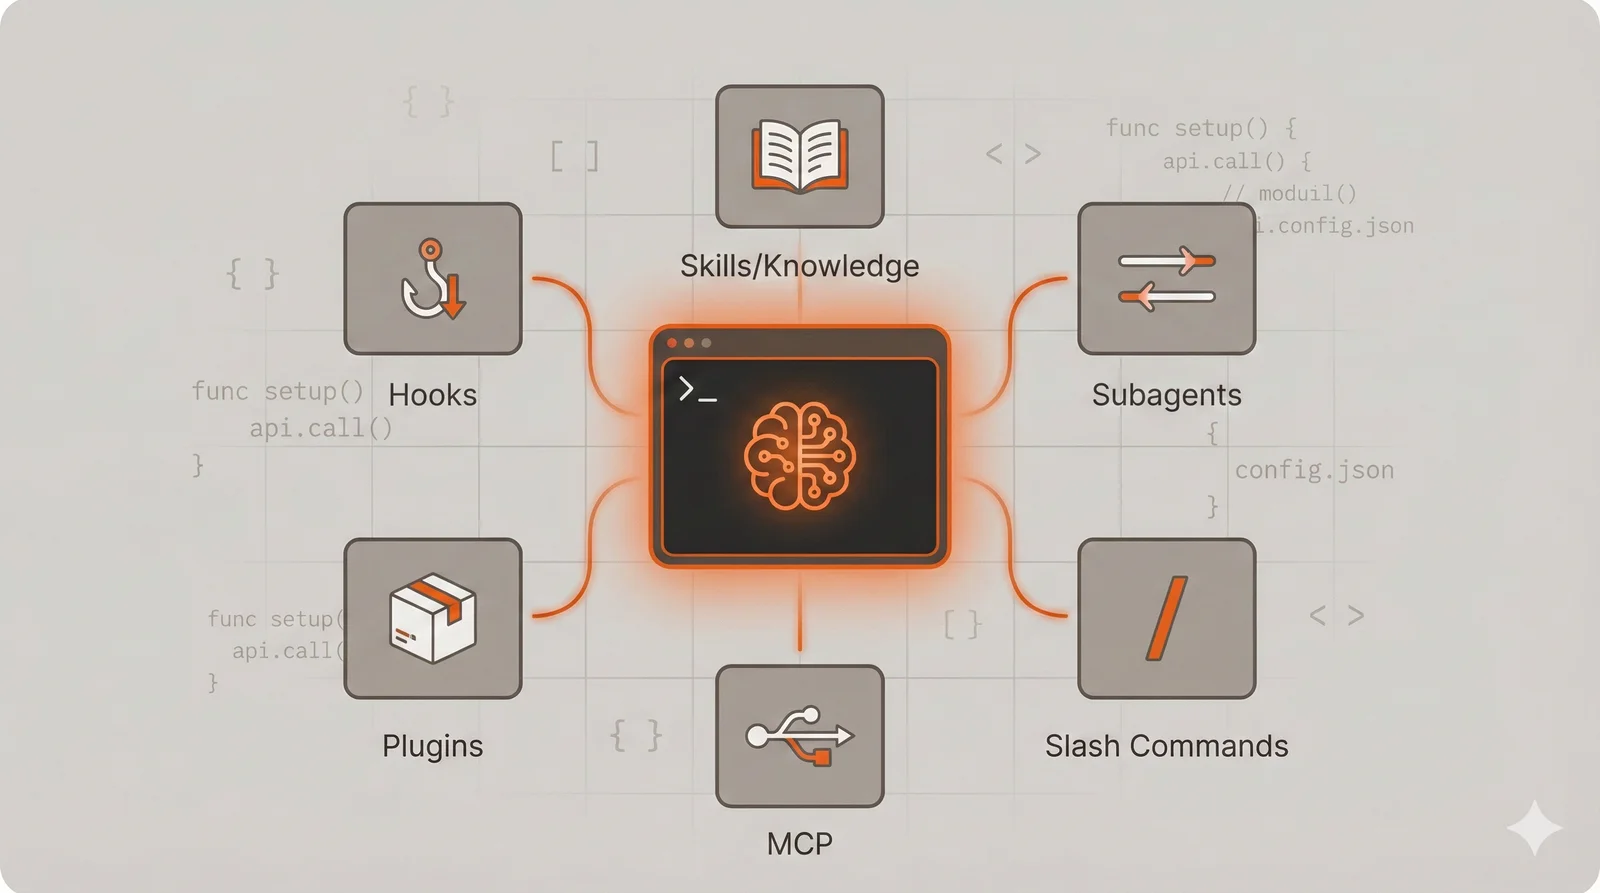
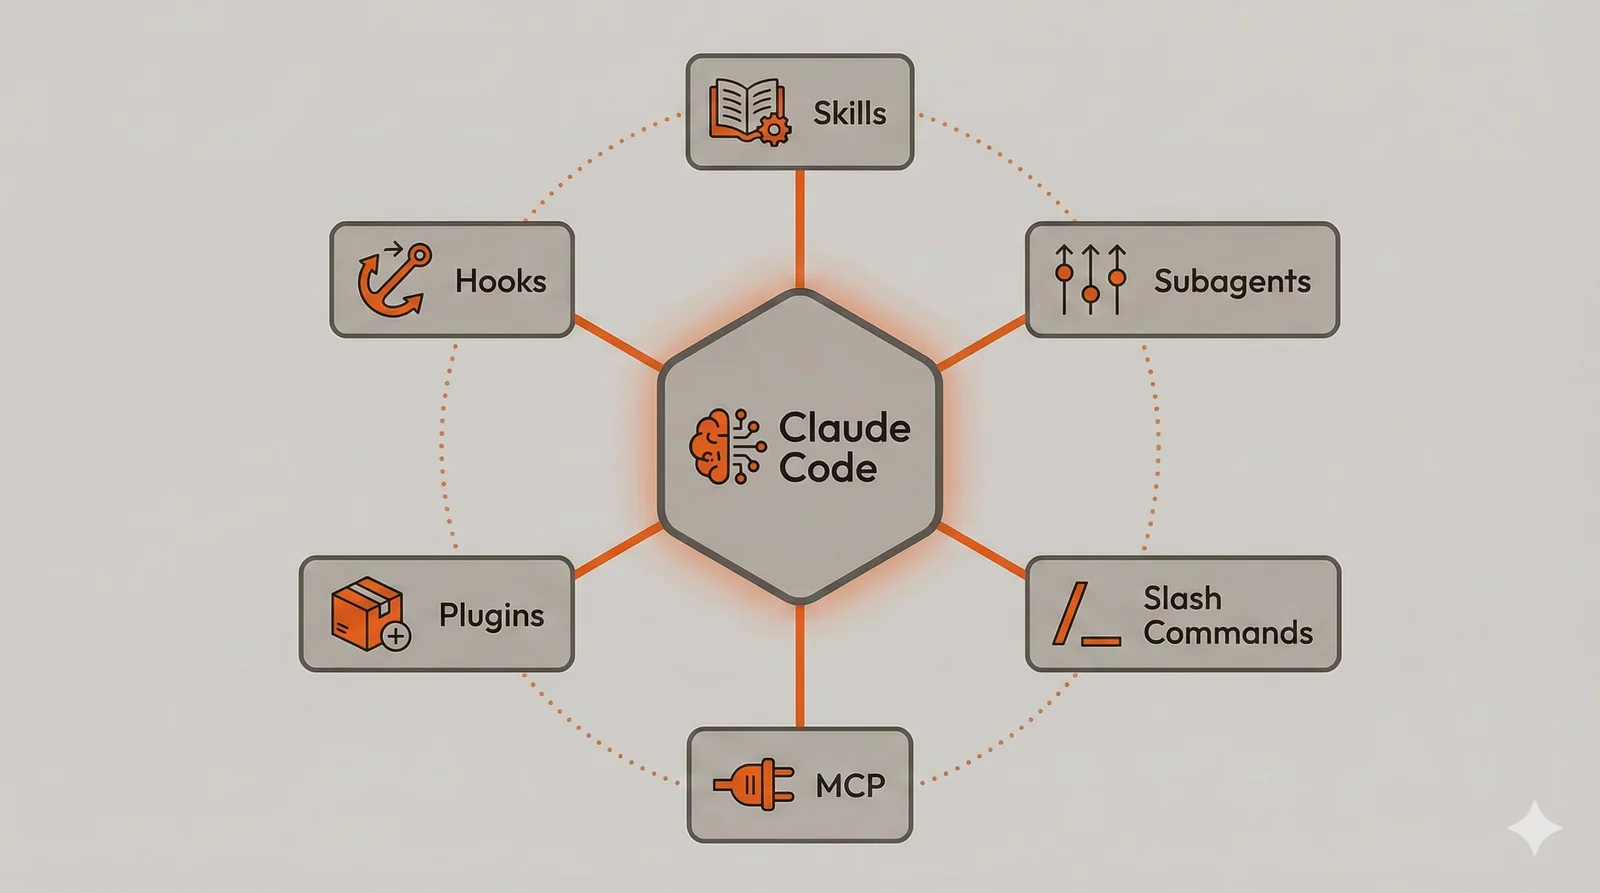
This guide covers six customization approaches: Skills, Subagents, Slash Commands, MCP integrations, Plugins, and Hooks. Each serves a distinct purpose, and understanding when to use which mechanism matters more than knowing their syntax. The examples throughout use Go backend development with Kubernetes and GitHub as a concrete context, but every technique applies regardless of your language or stack. A Python data engineer, a TypeScript frontend developer, or a Rust systems programmer would implement different skills and commands, but the underlying patterns remain identical.
In this guide: Skills · Subagents · Slash Commands · MCP · Plugins · Hooks · Combining Mechanisms · Choosing Between Mechanisms · Where to Start · Sharing and Collaboration
Skills: Encoding Project Knowledge
Skills solve a fundamental problem with AI assistants: context management. Every conversation starts fresh, requiring you to re-explain your project’s conventions, architectural decisions, and coding standards. System prompts help, but they consume context tokens regardless of whether that information is relevant to the current task. Skills provide a middle ground through progressive disclosure—Claude knows a skill exists (via a brief description loaded at startup) but only loads the full instructions when the skill matches your current request.
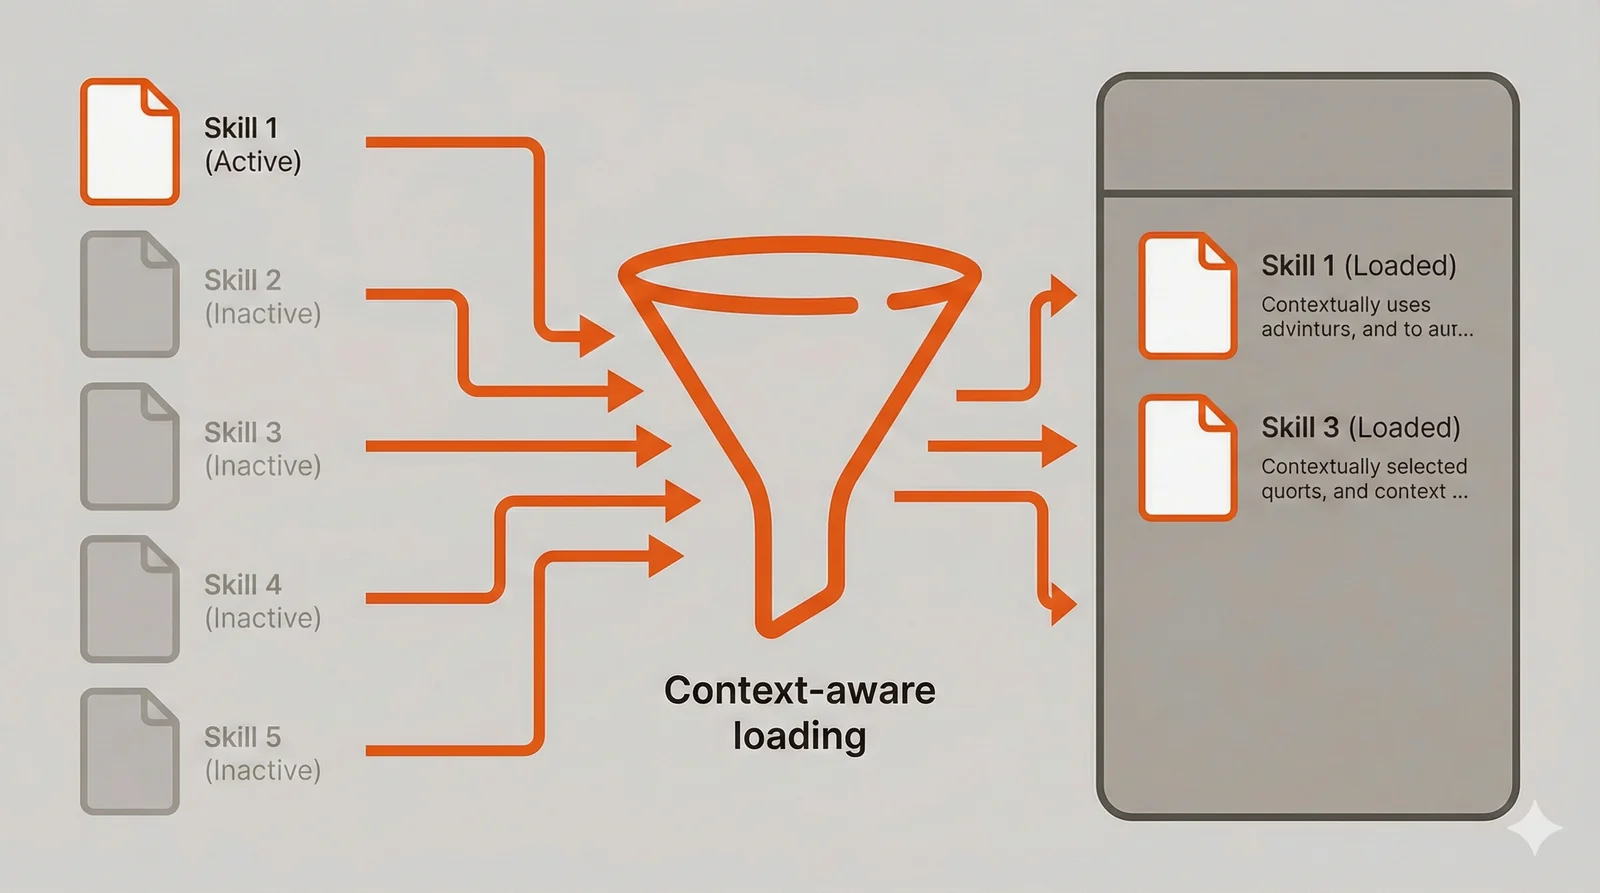
If you’ve used Cursor, skills serve a similar purpose to Cursor Rules—both let you define project-specific conventions and patterns that the AI follows. The difference lies in loading behavior: Cursor Rules load entirely at the start of every conversation, while Claude Code skills load on-demand based on relevance. This means you can maintain extensive skill libraries without bloating every session’s context.
The mechanics work like a reference library. Claude sees a catalog of available skills in the system prompt, each with a name and description. When you ask something that matches a skill’s description, Claude reads the full skill file from the filesystem, bringing those instructions into context. This means you can have dozens of skills covering different aspects of your project without paying the context cost for all of them simultaneously.
Skills excel at encoding conventions that would otherwise require constant reminders. Error handling patterns, logging conventions, testing strategies, and architectural decisions all vary across codebases. Your skill documents exactly which approaches your team uses and when each applies. A frontend project might encode component structure conventions and state management patterns. A data pipeline project might encode schema validation rules and transformation patterns. The mechanism adapts to whatever knowledge your project needs.
Create a skill by placing a SKILL.md file in .claude/skills/go-backend/:
---
name: go-backend
description: Go backend patterns for error handling, context propagation,
  structured logging, and testing. Use when writing or reviewing Go code.
---

# Go Backend Standards

## Error Handling

Wrap errors with context using fmt.Errorf with %w verb. Never discard
errors silently. Log errors at the boundary where they're handled,
not where they originate.

func (s \*Service) ProcessOrder(ctx context.Context, id string) error {
order, err := s.repo.GetOrder(ctx, id)
if err != nil {
return fmt.Errorf("fetching order %s: %w", id, err)
}
return nil
}

## Context Propagation

Pass context as the first parameter to all functions that perform I/O
or may need cancellation. Extract request-scoped values (trace IDs,
user info) from context rather than passing them as separate parameters.

## Structured Logging

Use slog for structured logging. Include trace IDs, operation names,
and relevant identifiers in every log entry. Log at appropriate levels:
Debug for detailed flow, Info for significant events, Error for failures.

## Testing

Use table-driven tests for functions with multiple input scenarios.
Create test fixtures in testdata/ directories. Use testify/assert
for assertions and testify/mock for interface mocking.
The description field deserves careful attention because it determines when Claude activates the skill. Vague descriptions like “Go development help” trigger too broadly, consuming context unnecessarily. Specific descriptions like “error handling, context propagation, structured logging, and testing conventions” give Claude clear signals about when the skill applies. You want skills to activate precisely when their knowledge is relevant.
Skills can also bundle executable scripts that Claude runs without loading their source code into context. A coverage checker script, for example, executes and returns only its output (the coverage percentage), not the script implementation. Place scripts in a scripts/ subdirectory within your skill folder. This makes skills more efficient than including equivalent instructions that Claude would need to follow step-by-step.
The decision to create a skill versus including information in a CLAUDE.md file (which always loads) depends on how frequently you need the information. Patterns you use in every session belong in CLAUDE.md. Specialized knowledge for particular task types belongs in skills. Your CLAUDE.md might cover project structure and build commands, while skills handle detailed conventions for specific activities like database migrations, API design, or deployment procedures.
Subagents: Isolated Specialized Workers
Subagents address context pollution and task parallelization. When Claude explores a codebase to answer a question, that exploration consumes context tokens. Ask Claude to review a pull request touching fifteen files, and suddenly your conversation history includes the contents of all those files plus Claude’s analysis. Subagents run in isolated contexts, performing their work independently and returning only their conclusions to the main conversation.
The isolation model means subagents forget everything after completing their task. They cannot reference earlier parts of your conversation or remember findings from previous invocations. This limitation is also a feature: it prevents exploratory work from accumulating in your context window. A security scan that examines every file in your repository returns a summary of findings, not the entire audit trail.
Parallelization provides the other major benefit, and this is where subagents become genuinely powerful. Claude can spawn multiple subagents simultaneously, creating what amounts to a fleet of specialized workers attacking different aspects of a problem. Running a code review agent, a security scanner, a test coverage analyzer, and a documentation checker in parallel takes roughly as long as the slowest one, not the sum of all four. For comprehensive pre-commit checks or thorough code audits, this parallelization transforms multi-minute sequential workflows into seconds.
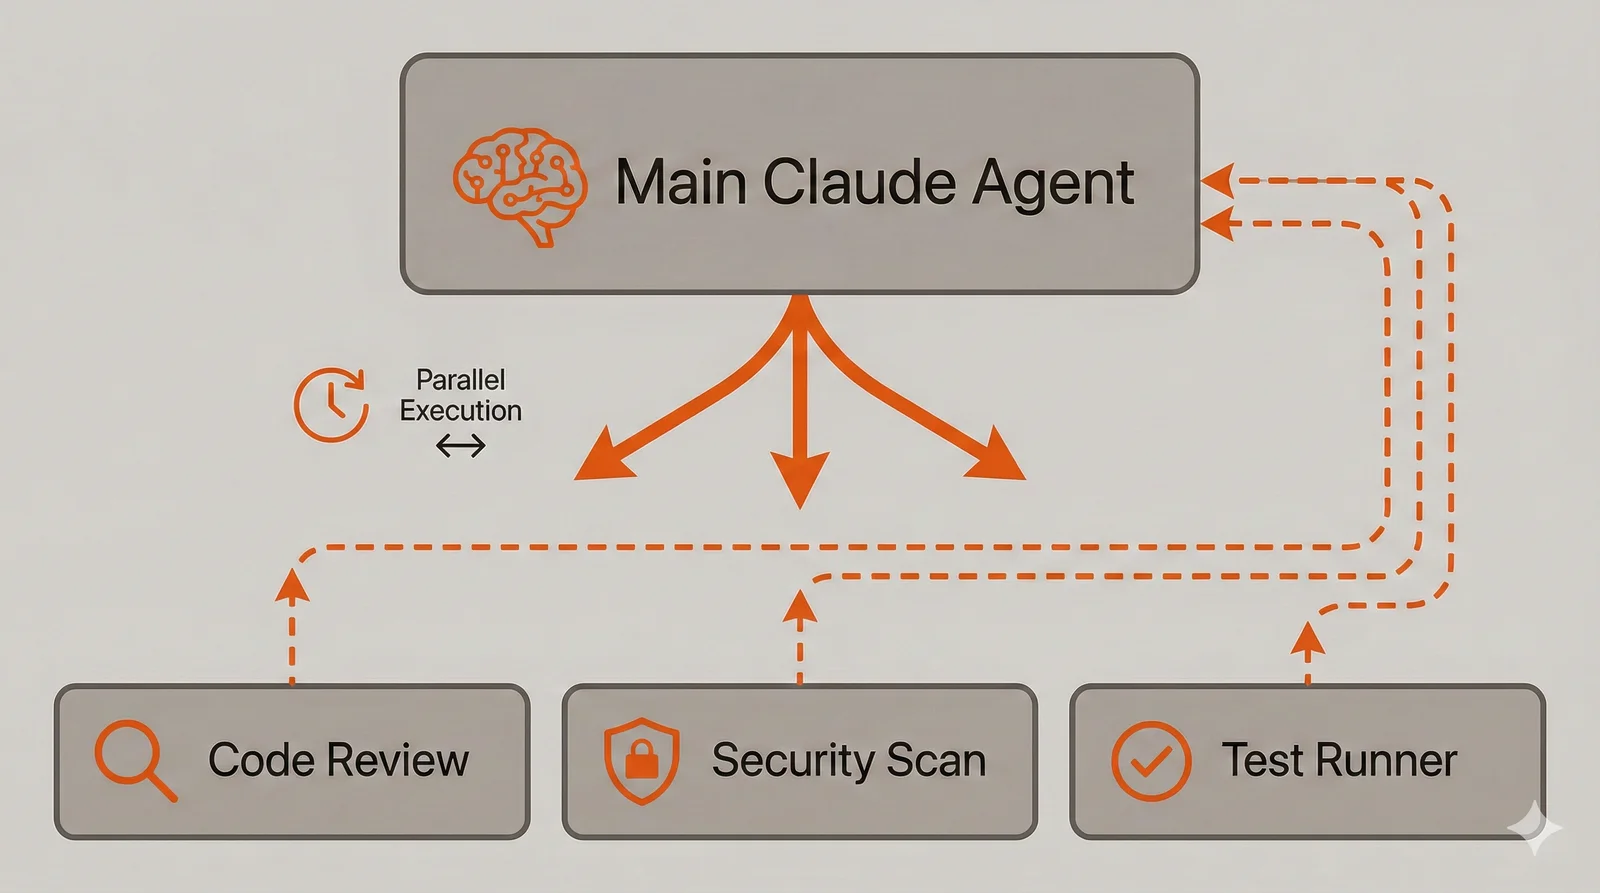
The fleet model does come with cost implications. Each subagent runs its own conversation with Claude, consuming tokens independently. Spawning five subagents to analyze a codebase means paying for five separate Claude conversations. For occasional comprehensive reviews, this tradeoff makes sense—the time savings justify the cost. For frequent lightweight checks, a single subagent or main conversation handling might be more economical. Understanding this cost structure helps you design subagent workflows that balance thoroughness with efficiency.
Consider subagents for tasks that require deep but temporary exploration. A code review subagent can have specific instructions about language idioms, common mistakes, and your team’s style preferences. It examines the changes, applies that specialized knowledge, and reports back without leaving the review context in your main conversation.
Define a subagent in .claude/agents/go-reviewer.md:
---
name: go-reviewer
description: Go code reviewer for PRs and implementations. Checks for
  unchecked errors, race conditions, resource leaks, and style issues.
  Use when reviewing Go files or pull requests.
tools: Read, Grep, Glob
---

You review Go code for correctness, performance, and maintainability.

When reviewing code, examine these areas:

Correctness: Unchecked errors (especially Close, Write, Flush calls),
missing context propagation, race conditions from shared state,
nil pointer dereferences, resource leaks from unclosed handles.

Performance: Unnecessary allocations in loops, string concatenation
instead of strings.Builder, missing buffer pooling, inefficient
slice operations without preallocation.

Maintainability: Missing documentation on exported types, inconsistent
error messages, magic numbers without constants, functions exceeding
reasonable complexity.

Provide specific feedback with code examples showing recommended fixes.
Prioritize issues by severity: correctness problems first, then
performance, then style.

Format your response as a markdown document with the following structure:

## Summary

Brief overview of findings and overall code quality assessment.

## Critical Issues

Issues that must be fixed before merging.

## Recommendations

Suggested improvements that would enhance the code.

## Files Reviewed

List of files examined with brief notes on each.
The output format instruction at the end of the subagent definition deserves attention. Since subagents return only their final response to the main conversation, structuring that response as a well-formatted markdown document preserves more useful information. Without explicit formatting instructions, subagents might return terse summaries that lose important details. A structured markdown response with sections for critical issues, recommendations, and files reviewed gives you actionable information without needing to re-run the subagent or dig through conversation history. This technique works particularly well for audit-style subagents where you want comprehensive findings delivered in a scannable format.
Tool restrictions matter for subagents. A review agent that can only read files cannot accidentally modify your code while investigating an issue. A deployment agent might need Bash access to run kubectl commands but shouldn’t edit source files. These restrictions create safety boundaries that prevent subagents from taking unintended actions. The tools field in the frontmatter accepts a comma-separated list of allowed tools: Read, Grep, Glob for read-only analysis, Read, Edit, Write, Bash for agents that need to make changes.
The decision between handling something in the main conversation versus spawning a subagent depends on whether you need the details afterward. If you’re asking Claude to review code and then discuss specific findings in depth, keep it in the main conversation so Claude remembers the context. If you want a quick security scan before deploying and don’t need to discuss the findings, a subagent produces a cleaner result without context overhead.
Subagent descriptions influence when Claude automatically spawns them versus handling requests directly. Including phrases like “Use PROACTIVELY” or “MUST be invoked for authentication changes” in descriptions makes Claude more likely to spawn the subagent without explicit requests. This enables workflows where certain checks happen automatically based on the nature of your request. A security-focused subagent with “MUST be invoked for any changes to authentication, authorization, or credential handling” in its description will automatically run whenever you work on login flows or API authentication, without you explicitly requesting a security review.
Slash Commands: Codified Workflows
Slash commands capture multi-step workflows as reusable templates. Unlike skills that provide knowledge, slash commands provide procedures. They’re the difference between teaching someone about Kubernetes concepts versus giving them a script that generates deployment manifests. Both have value, but they serve different purposes.
The value of slash commands increases with workflow complexity and frequency. A workflow you run once per month doesn’t justify the effort of codifying it. A workflow you run multiple times per day, especially one with multiple steps that must execute in sequence, benefits enormously from becoming a slash command. The command encapsulates the procedure so you don’t need to remember and type out each step.
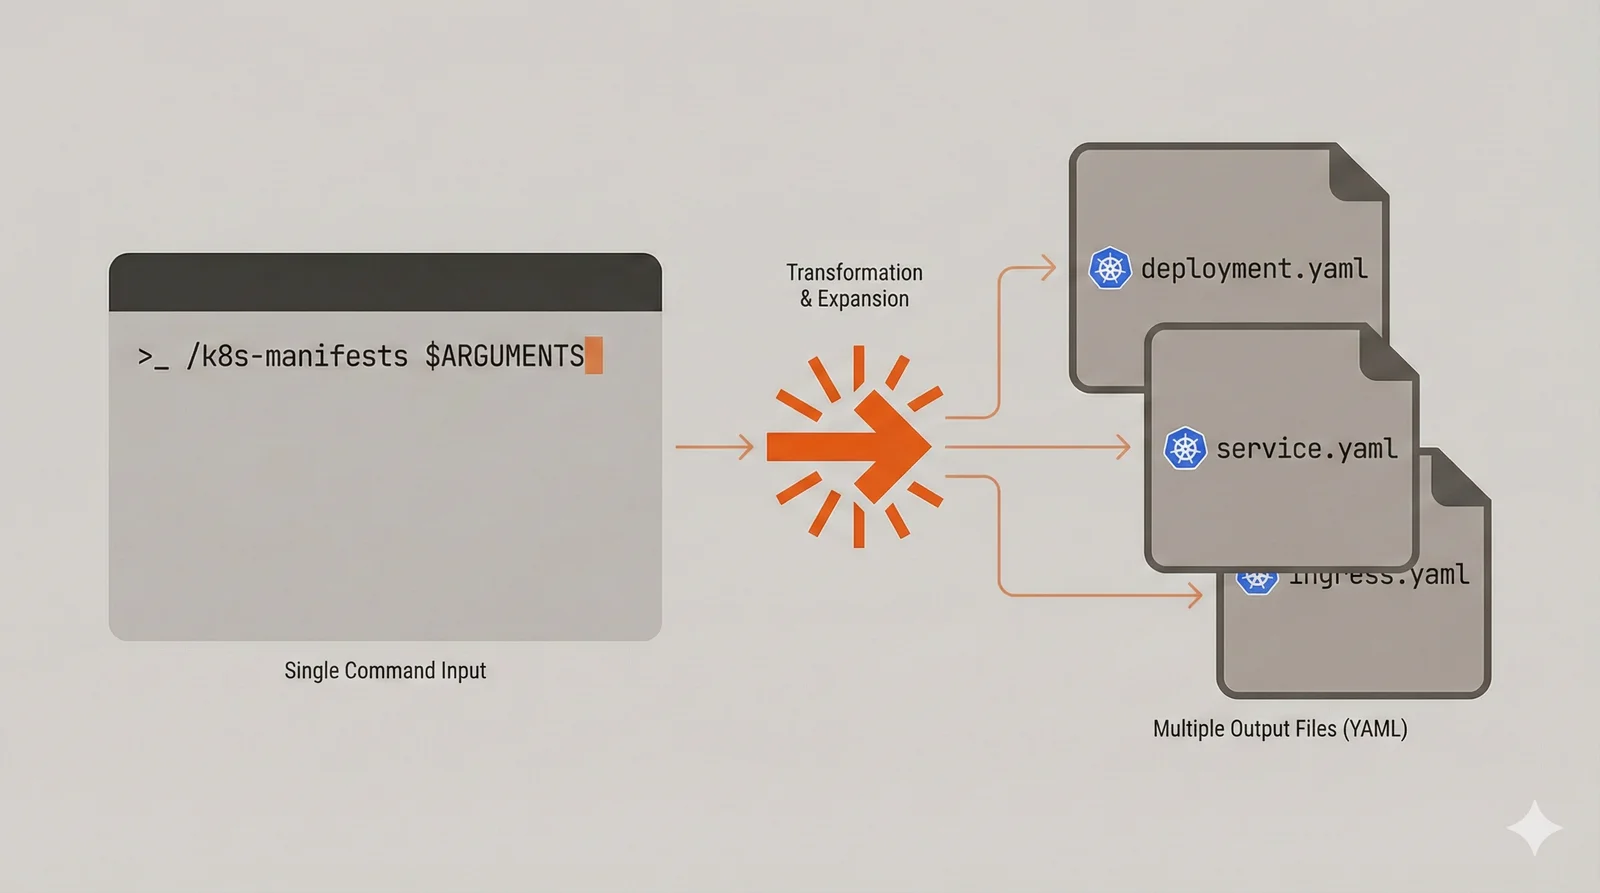
Slash commands support arguments through the $ARGUMENTS placeholder, enabling parameterization. A /deploy staging command can behave differently from /deploy production while sharing the same underlying procedure. This makes commands flexible without requiring separate commands for every variation.
Slash commands excel at codifying deployment procedures, test workflows, and code generation tasks. Generating Kubernetes manifests from a service involves reading the service’s configuration, identifying ports and environment variables, and producing multiple YAML files with proper structure. That’s tedious to describe every time but trivial to invoke as /k8s-manifests ./cmd/orderservice.
Create commands in .claude/commands/k8s-manifests.md:
---
description: Generate Kubernetes deployment manifests from service code
allowed-tools: Read, Write, Glob, Bash
---

Analyze the service at the path provided and generate production-ready
Kubernetes manifests.

## Analysis Steps

1. Read main.go or cmd/\*/main.go to identify:

   - Service name from module path or package name
   - HTTP/gRPC ports from server configuration
   - Environment variables from os.Getenv or config loading
   - Health check endpoints if defined

2. Read go.mod (or package.json, requirements.txt) for the module name

## Generated Files

Create these files in deployments/kubernetes/:

deployment.yaml:

- Deployment with 3 replicas
- Resource requests: 256Mi memory, 250m CPU
- Resource limits: 512Mi memory, 500m CPU
- Liveness probe on /healthz, readiness on /readyz
- Pod anti-affinity for node spreading
- Security context: non-root, read-only filesystem

service.yaml:

- ClusterIP service on identified ports
- Proper port naming for service mesh compatibility

configmap.yaml:

- Non-sensitive environment variables extracted from code

hpa.yaml:

- Scale on CPU (70%) and memory (80%)
- Min 3, max 10 replicas

## Target

Service path: $ARGUMENTS
The allowed-tools frontmatter restricts what Claude can do while executing the command. A command that only generates files might restrict tools to Read, Write, and Glob. A command that runs tests needs Bash access. These restrictions prevent commands from having broader capabilities than necessary.
Commands can reference files using the @ prefix and execute shell commands using the ! prefix within backticks. A command that needs current git status can include !`git status` to inject that information into the prompt. This enables commands that adapt to current project state rather than operating on static assumptions.
The distinction between slash commands and skills sometimes blurs. A general rule: if you’re encoding knowledge that Claude applies across many different tasks, use a skill. If you’re encoding a specific procedure that runs the same way each time, use a slash command. Your coding conventions are knowledge (skill). Your deployment procedure is a workflow (command).
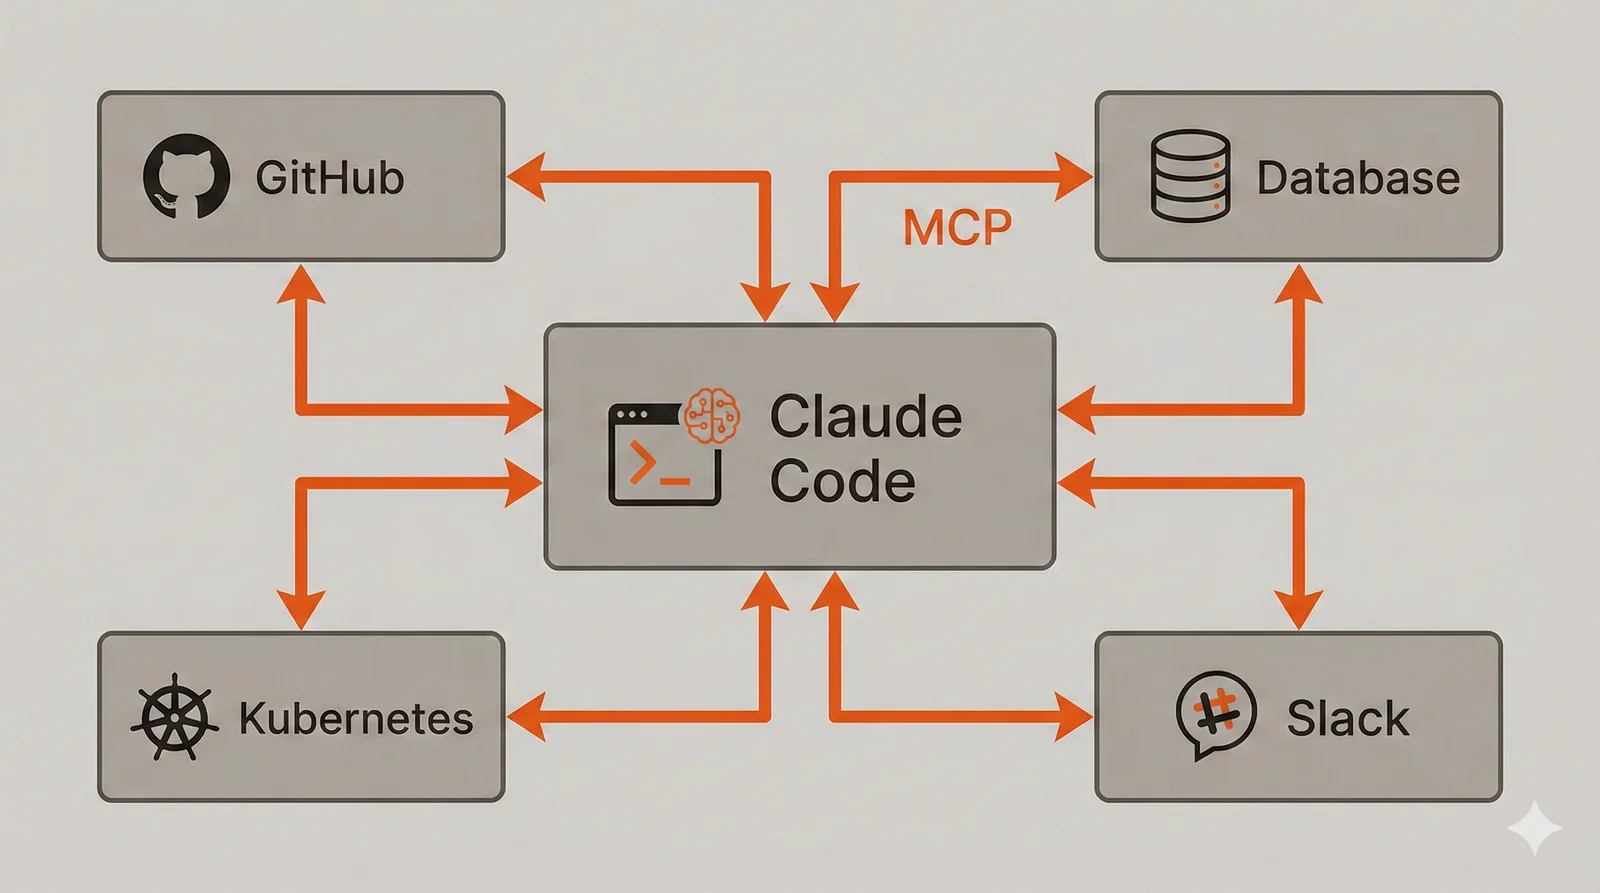
MCP: External System Integration
The Model Context Protocol connects Claude to external services and tools through a standardized interface. MCP servers expose capabilities that Claude can invoke during conversations, extending functionality beyond built-in tools. Where skills provide knowledge, MCP provides integration with systems outside Claude’s native reach.
The protocol standardizes how AI assistants communicate with external tools, meaning MCP servers work across different AI products that support the protocol. An MCP server for GitHub works with Claude Code, Claude Desktop, and other MCP-compatible clients. This interoperability means investment in MCP integrations pays dividends across your tooling ecosystem.
MCP servers come in two primary transport types. HTTP transport connects to remote services, typically cloud APIs or hosted tools. Stdio transport runs local processes, useful for tools that need filesystem access or shouldn’t send data to external servers. The transport choice depends on where the tool runs and what data it accesses.
The GitHub MCP server enables Claude to create issues, review pull requests, manage labels, and perform repository operations without leaving your terminal. Instead of copying error messages to GitHub’s web interface, you ask Claude to “create an issue for this null pointer bug with the stack trace” and it handles the API interaction.
Add MCP servers using the CLI:
# GitHub integration for issues and PRs
claude mcp add --transport http github https://mcp.github.com/sse

# Local filesystem operations with enhanced capabilities
claude mcp add --transport stdio filesystem -- npx -y @anthropic/mcp-server-filesystem

# Sequential thinking for complex problem decomposition
claude mcp add --transport stdio thinking -- npx -y @anthropic/mcp-server-sequential-thinking
Or configure them in .mcp.json for project-specific settings:
{
	"mcpServers": {
		"github": {
			"transport": "http",
			"url": "https://mcp.github.com/sse"
		},
		"filesystem": {
			"transport": "stdio",
			"command": "npx",
			"args": ["-y", "@anthropic/mcp-server-filesystem"]
		}
	}
}
The GitHub MCP server transforms workflows that previously required context switching. Triaging issues becomes a conversation: “show me open bugs labeled ‘high-priority’ in the api-gateway repo.” Creating pull requests includes context from your conversation: Claude knows what changes were made and why, producing more informative PR descriptions than manual summarization.
MCP servers can also wrap internal tools. A deployment pipeline MCP server could expose capabilities for triggering deployments, checking rollout status, and initiating rollbacks. Instead of remembering kubectl commands or navigating CI/CD interfaces, you ask Claude to “deploy the order service to staging and watch the rollout.” The MCP server translates that intent into the appropriate operations.
Token limits apply to MCP tool outputs. Claude Code warns when outputs exceed 10,000 tokens and enforces a default maximum of 25,000 tokens. Operations that return large datasets (like listing all issues in a busy repository) may hit these limits. The MAX_MCP_OUTPUT_TOKENS environment variable adjusts the ceiling if needed.
Security deserves consideration when adding MCP servers. Each server gains capabilities within your Claude sessions, potentially accessing sensitive data or performing consequential actions. Only install servers from trusted sources, and review what capabilities they expose. The GitHub MCP server needs repository access; ensure you’re comfortable with that access level before enabling it.
Plugins: Distributable Configurations
Plugins package skills, commands, agents, and MCP configurations into distributable units. They solve the problem of sharing Claude Code customizations across team members or projects. Without plugins, each developer configures their environment independently, leading to inconsistent tooling and duplicated effort. Plugins enable a platform team to define standard configurations that everyone uses.
The packaging model bundles related customizations into a directory structure that Claude Code recognizes. A backend development plugin might include a skill for coding conventions, subagents for code review and security scanning, slash commands for common workflows, and hooks for formatting enforcement. Installing the plugin activates all these customizations together.
Distribution happens through marketplaces, which are simply Git repositories containing plugin definitions. A marketplace repository holds an index.json file listing available plugins and their locations. Organizations can host private marketplaces with internal plugins, ensuring proprietary conventions and integrations remain private. Public marketplaces enable sharing plugins with the broader community.
For teams wanting to share plugins privately, the process involves creating a private Git repository as your marketplace. Create a repository (on GitHub, GitLab, or any Git host your team can access) containing an index.json that references your plugins. Each plugin can live in the same repository or in separate private repositories. Team members add the marketplace to their Claude Code configuration, and from that point they can install plugins from it just like public ones.
To set up a private team marketplace, create a repository with this structure:
team-claude-plugins/
├── index.json
├── backend-dev/
│   ├── .claude-plugin/
│   │   └── plugin.json
│   ├── skills/
│   ├── commands/
│   └── agents/
└── frontend-dev/
    └── ...
The index.json file lists available plugins:
{
	"plugins": [
		{
			"name": "backend-dev",
			"version": "1.0.0",
			"description": "Backend development toolkit",
			"path": "./backend-dev"
		}
	]
}
Team members register the marketplace in their settings and install plugins:
# Add the private marketplace (uses Git authentication)
/plugin marketplace add team-plugins [email protected]:yourorg/team-claude-plugins.git

# Install a plugin from the marketplace
/plugin install backend-dev@team-plugins
Because the marketplace uses standard Git authentication, access control follows your existing repository permissions. Team members with read access to the repository can install plugins; those without access cannot. This integrates naturally with your organization’s access management without requiring separate authentication systems.
For teams, plugins standardize the development environment. New team members install the team’s plugin and immediately have access to established conventions, workflows, and automations. Updates to the plugin propagate to everyone, ensuring consistency as practices evolve. This beats the alternative of maintaining setup documentation that gradually drifts from actual practice.
Plugin structure follows a standard layout:
backend-plugin/
├── .claude-plugin/
│   └── plugin.json
├── commands/
│   ├── k8s-manifests.md
│   ├── fix-tests.md
│   └── new-service.md
├── agents/
│   ├── code-reviewer.md
│   └── security-scanner.md
├── skills/
│   └── backend/
│       ├── SKILL.md
│       └── scripts/
│           └── check-coverage.sh
├── hooks/
│   └── hooks.json
└── README.md
The plugin.json manifest declares plugin metadata and can include hook configurations:
{
	"name": "backend-dev",
	"version": "1.0.0",
	"description": "Backend development toolkit with K8s integration",
	"author": "Platform Team",
	"hooks": {
		"PostToolUse": [
			{
				"matcher": "Edit|Write",
				"hooks": [
					{
						"type": "command",
						"command": "bash ${CLAUDE_PLUGIN_ROOT}/hooks/scripts/format.sh",
						"timeout": 30
					}
				]
			}
		]
	}
}
Plugin development involves creating and testing customizations locally, then packaging them for distribution. Start with local configurations in your .claude/ directory, verify they work correctly, then restructure them into plugin format. This workflow ensures plugins contain tested, working configurations rather than theoretical setups.
The decision to create a plugin versus sharing configurations through documentation depends on how many people need the customizations and how frequently they change. A configuration used by two developers on a single project doesn’t need plugin infrastructure. Configurations used by a department across dozens of projects benefit enormously from plugin distribution.
Hooks: Automated Enforcement
Hooks execute shell commands at specific points in Claude’s lifecycle: before tool calls, after tool calls, when sessions start, and several other events. Unlike skills and commands that guide Claude’s behavior, hooks enforce constraints regardless of what Claude decides to do.
Most developers won’t need hooks immediately. The other mechanisms covered earlier handle the majority of customization needs. Hooks become relevant when you need guaranteed enforcement—when “Claude should do X” isn’t strong enough and you need “X will happen automatically, period.” Common use cases include auto-formatting code after edits and blocking modifications to generated files.
Configure hooks in .claude/settings.json:
{
	"hooks": {
		"PostToolUse": [
			{
				"matcher": "Edit|Write",
				"hooks": [
					{
						"type": "command",
						"command": "jq -r '.tool_input.file_path' | xargs -I {} sh -c 'case \"{}\" in *.go) gofmt -w \"{}\" ;; *.ts|*.tsx) npx prettier --write \"{}\" ;; esac'",
						"timeout": 30
					}
				]
			}
		]
	}
}
Hooks communicate through exit codes: 0 for success, 2 to block the operation and display an error to Claude. The matcher field uses regex to filter which tools trigger the hook. Hook execution adds latency to operations, so keep them fast and use precise matchers. For most workflows, skills and commands provide sufficient control without hooks’ complexity.
Combining Mechanisms Effectively
These six mechanisms work together, and understanding their interactions produces more powerful configurations than any single mechanism alone. Skills provide knowledge that slash commands reference. Subagents perform specialized tasks in isolation. MCP servers connect to external systems. Plugins package everything for distribution. Hooks enforce critical standards automatically.
Consider implementing a new API endpoint. The backend skill activates based on your request, providing conventions for error handling and testing. You invoke a /new-endpoint slash command that generates boilerplate following those conventions. A security-scanner subagent reviews the implementation before you commit. The GitHub MCP server creates a pull request with context from your conversation. All of this could be packaged in a plugin that new team members install on day one. If your team has strict formatting requirements, a hook guarantees compliance.
The layering also enables progressive adoption. Start with a CLAUDE.md file describing your project. Add a skill when you find yourself repeatedly explaining the same conventions. Create a slash command when a multi-step workflow becomes tedious. Install MCP servers when you want external integrations. Package into a plugin when you need to share with others. Add hooks only when you need absolute enforcement. Each layer adds capability without requiring the others.
Overlap between mechanisms sometimes creates choices. Both skills and slash commands can provide instructions for generating deployment manifests. The difference lies in how they’re invoked: skills activate automatically based on context, while commands require explicit invocation. If you want Claude to always use certain patterns when generating manifests (regardless of how you phrase the request), put the instructions in a skill. If you want a specific procedure you invoke deliberately, create a command.
Choosing Between Mechanisms
The overlap between these mechanisms raises practical questions about which to use when. Skills and subagents both provide specialized instructions, but they serve different purposes. Skills inject knowledge into your main conversation, keeping context available for follow-up discussion. Subagents work in isolation and return only conclusions, keeping your context clean but preventing detailed follow-up without re-running the subagent.
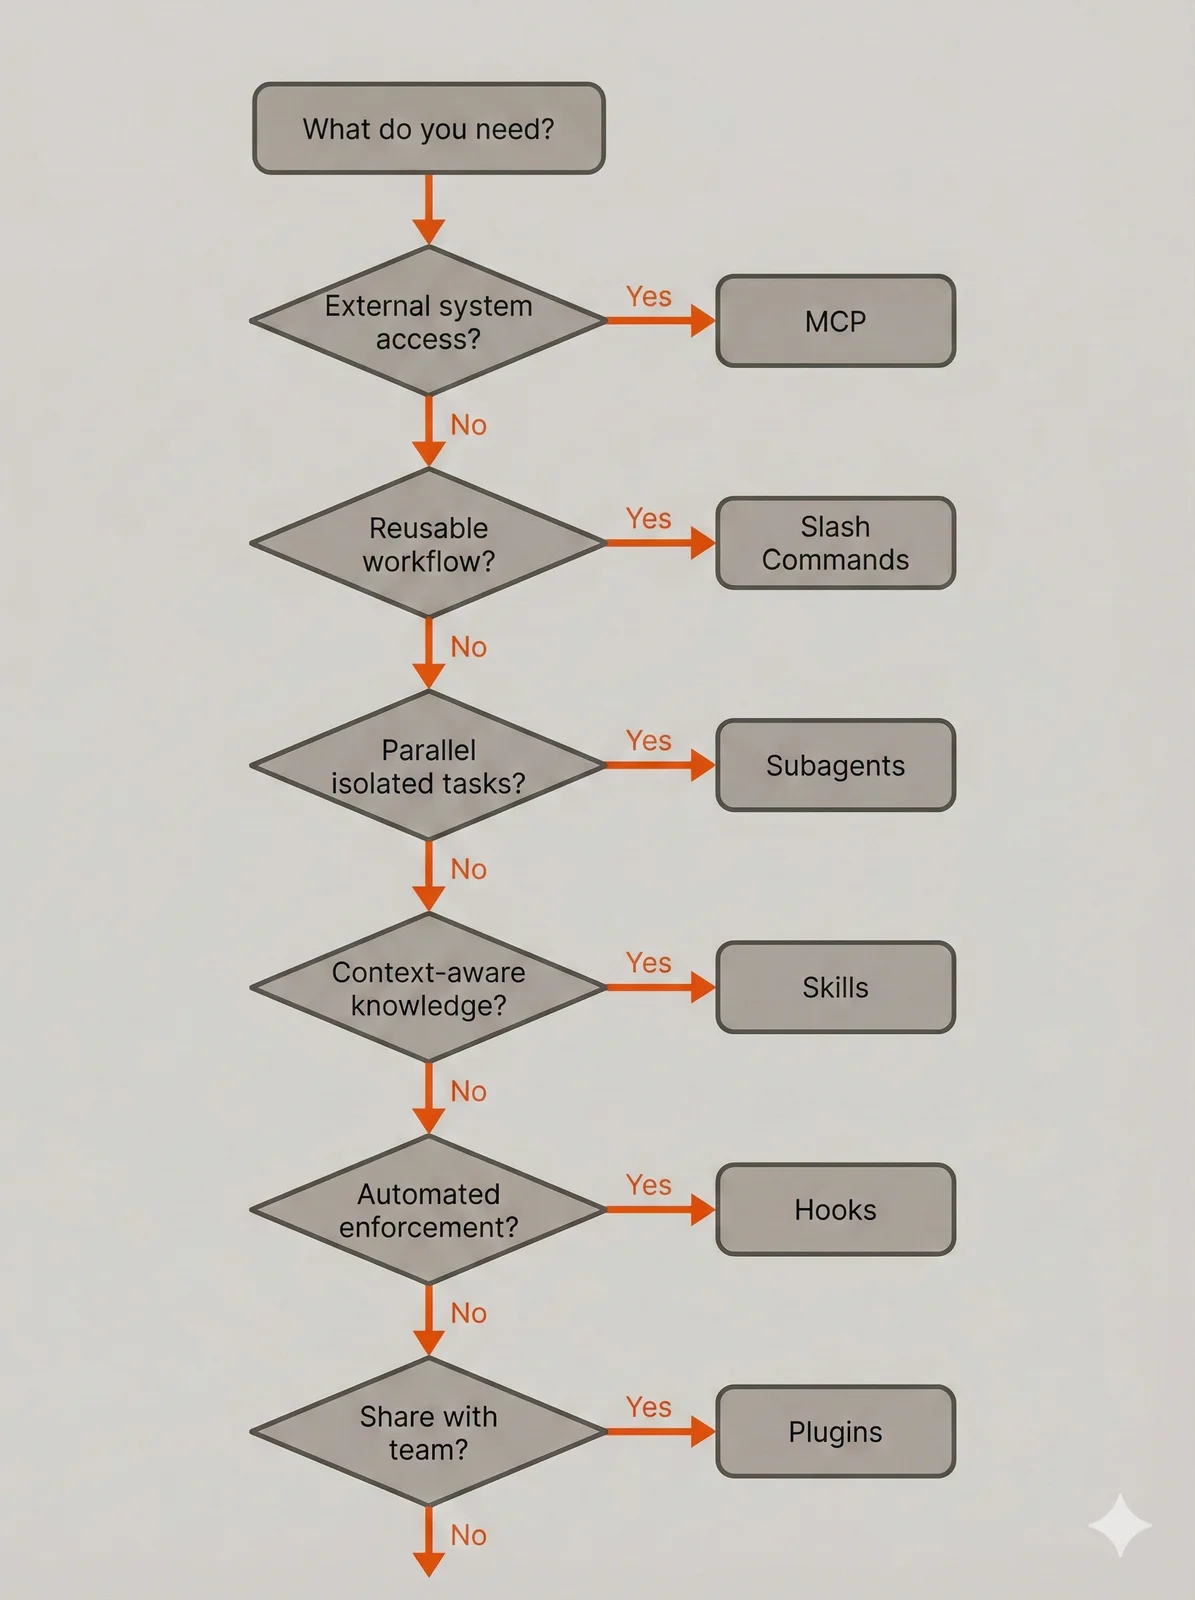
Use skills when the knowledge should persist in conversation context. Your error handling conventions belong in a skill because you’ll want Claude to reference them while discussing implementation alternatives or explaining why certain approaches were chosen. Use subagents when you want a comprehensive analysis without caring about the details. A security scan that returns “3 high-severity issues found in auth.go” serves most purposes; you don’t need the full audit trail in your context.
Skills and slash commands also overlap conceptually. Both can instruct Claude to generate deployment manifests following certain patterns. The distinction is automatic versus explicit invocation. Skills activate when Claude recognizes relevance from your natural language request. Commands activate when you type /command-name. If you always want certain patterns applied regardless of how you phrase the request, encode them in a skill. If you want a specific procedure available on demand, create a command.
Hooks stand apart from other mechanisms because they provide enforcement rather than guidance. A skill saying “run the formatter after editing files” relies on Claude following the instruction. A hook running the formatter after every Edit operation guarantees the outcome. This matters for team standards that must be followed consistently, not just when someone remembers to ask. But for most individual developers, the guidance provided by skills and commands suffices.
Where to Start
Not all mechanisms deliver equal value for equal effort. If you’re new to Claude Code customization, prioritize based on immediate impact and learning curve.
Start with MCP integrations if you work with GitHub regularly. The GitHub MCP server installation takes under a minute and immediately enables issue creation, PR management, and repository operations from within Claude Code. The workflow transformation is substantial: instead of context-switching to GitHub’s web interface, you describe what you want in natural language. This single integration often provides more daily value than elaborate custom configurations.
Next, create a CLAUDE.md file in your project root describing your project structure, build commands, and any conventions Claude should follow. This file loads automatically every session and provides baseline context without requiring you to learn new concepts. Many developers stop here and get significant value.
When you find yourself repeatedly explaining the same conventions across sessions, graduate to skills. The progressive loading model means skills don’t cost context until needed, so you can create multiple skills for different aspects of your workflow. A backend conventions skill, a deployment skill, and a testing conventions skill can coexist without overhead until individually triggered.
Slash commands become valuable once you identify multi-step workflows you run repeatedly. The investment in writing a command pays off when you execute it daily. Start with your most frequent workflows: the commands you’d reach for if they existed.
Subagents matter when context pollution becomes a problem—when exploratory work consumes so much context that Claude loses track of the original conversation. Plugins become relevant when sharing configurations across team members or projects. Hooks address the narrowest use case: when enforcement must be absolute rather than advisory, and when the performance overhead is acceptable.
Sharing and Collaboration
Not everything you create belongs in the same place. Some configurations are personal preferences, others are team standards, and some might benefit developers you’ll never meet. Understanding where to put what makes collaboration smoother and prevents conflicts.
Personal preferences belong in your user directory (~/.claude/). Editor-like settings, personal productivity commands, and experimental configurations that might break things live here. A slash command that formats output the way you like it, or a subagent tuned to your review style, shouldn’t be imposed on teammates. User-level configurations also let you maintain consistency across different projects without duplicating files.
Project standards belong in the project’s .claude/ directory and should be committed to version control. Team coding conventions encoded in skills, required formatting hooks, and deployment workflows that everyone should follow go here. When a new team member clones the repository, they inherit these configurations automatically. This is where you encode “how we do things on this project” rather than “how I personally prefer to work.”
Some configurations sit in .claude/settings.local.json, which should be gitignored. Machine-specific paths, local development server URLs, and configurations that reference tools installed in non-standard locations belong here. This file lets developers customize their environment without creating merge conflicts or breaking teammates whose setups differ.
The decision of what to share extends beyond your immediate team. If you’ve built a useful skill for working with a particular framework, or a set of slash commands that streamline a common workflow, consider whether the broader community might benefit. A well-documented plugin that solves a problem you struggled with probably solves the same problem for others.
The community has already assembled substantial collections of reusable configurations. The awesome-mcp-servers repository catalogs MCP servers for databases, APIs, development tools, and cloud services. Before building a custom integration, check whether someone has already published one. The awesome-claude-code repository from Anthropic contains official and community plugins covering various development workflows. These collections grow continuously as developers share their configurations.
Contributing back follows the same pattern as any open source work. Start by using existing configurations, then modify them for your needs, and eventually publish your own when you’ve built something genuinely useful. A plugin that encodes your team’s hard-won conventions around a tricky framework might save other teams significant debugging time. The ecosystem benefits when developers share configurations that took real effort to get right.
The Compound Effect
The initial investment in customizing Claude Code pays compound returns over time. Configurations that match your actual workflow eliminate friction in every subsequent session. Automated enforcement catches issues before they reach code review. Integrated tools reduce context switching. The productivity gains accumulate with every task that benefits from your customizations.
The patterns described here apply regardless of your technology stack. Swap Go for Python, Kubernetes for Docker Compose, GitHub for GitLab—the mechanisms work identically. What matters is identifying the conventions, workflows, and integrations specific to your work, then encoding them in the appropriate Claude Code extension. The examples provide a starting template; your actual configurations will reflect your project’s unique requirements.
Comments
Reply on Bluesky here to join the conversation.